Build Log
USS Constitution:
The "USS Constitution" was built in Boston, Massachusetts at Edmund Hartt's ship yard under the Naval Act of 1974. She was one of six frigates that were built even stronger and more heavily armed than the standard frigates of the time. She was launched in 1797 and earned a successful reputation as a naval vessel, most notably during the war of 1812 when she defeated five British vessels and attained the nickname "Old Ironsides" as well as the public's adoration. Due to her historical achievements and public support, Constitution avoided the scrapyard and was classified as a museum ship in 1907. Throughout her many years after service, constant attention has been directed towards restoration and maintenance, making her a truly remarkable icon of the history of the United States.
The "USS Constitution" was built in Boston, Massachusetts at Edmund Hartt's ship yard under the Naval Act of 1974. She was one of six frigates that were built even stronger and more heavily armed than the standard frigates of the time. She was launched in 1797 and earned a successful reputation as a naval vessel, most notably during the war of 1812 when she defeated five British vessels and attained the nickname "Old Ironsides" as well as the public's adoration. Due to her historical achievements and public support, Constitution avoided the scrapyard and was classified as a museum ship in 1907. Throughout her many years after service, constant attention has been directed towards restoration and maintenance, making her a truly remarkable icon of the history of the United States.
|
Carving and Detailing the Hull:
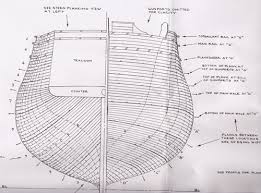
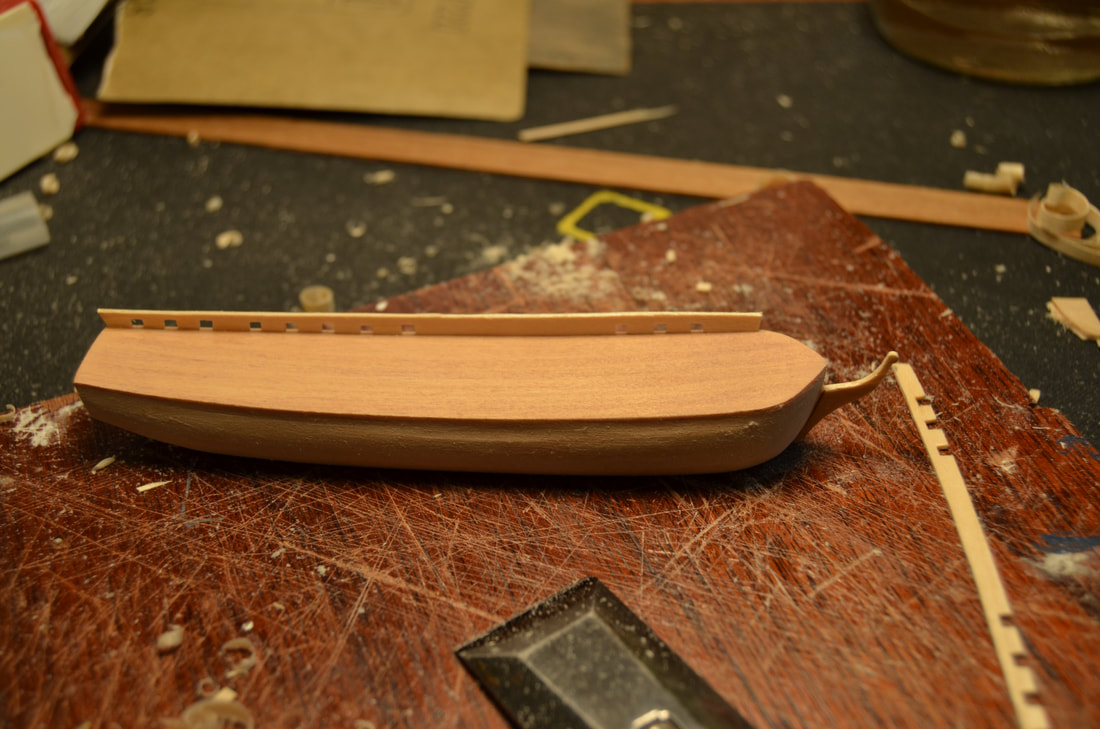
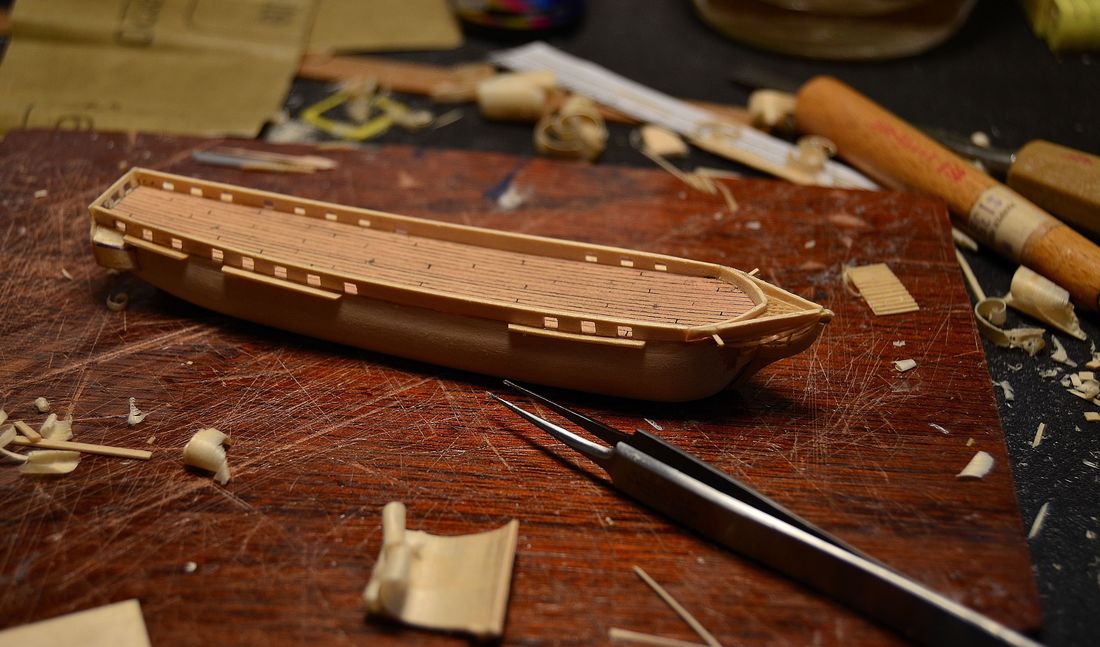
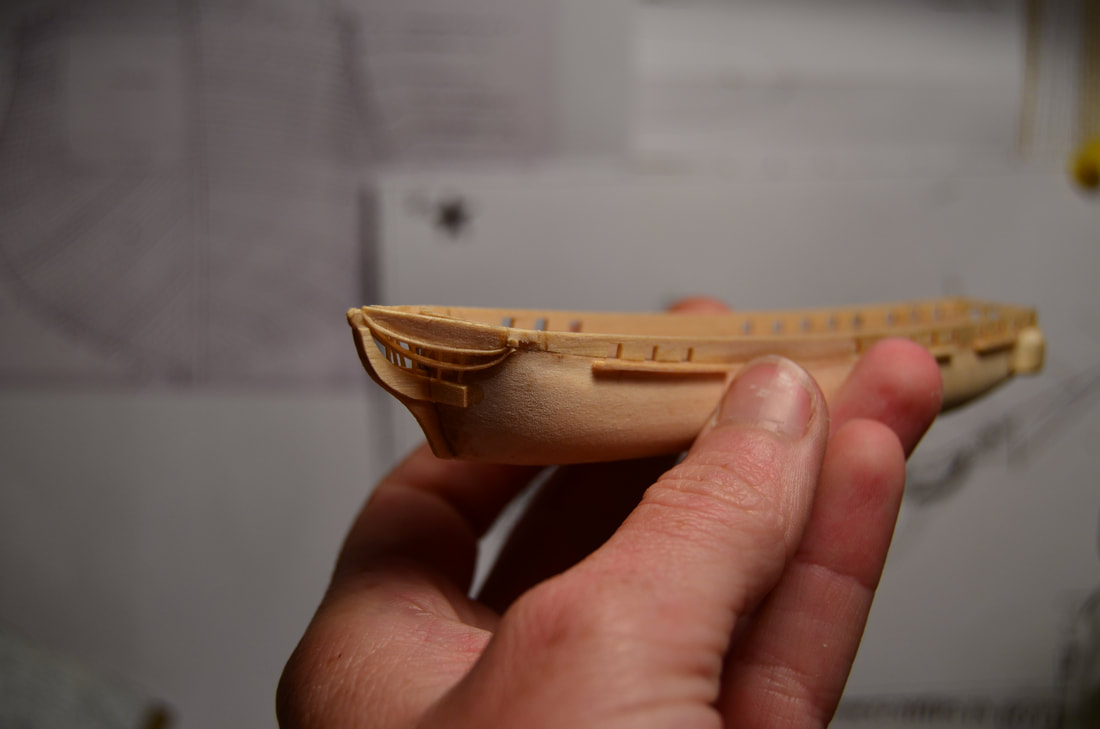
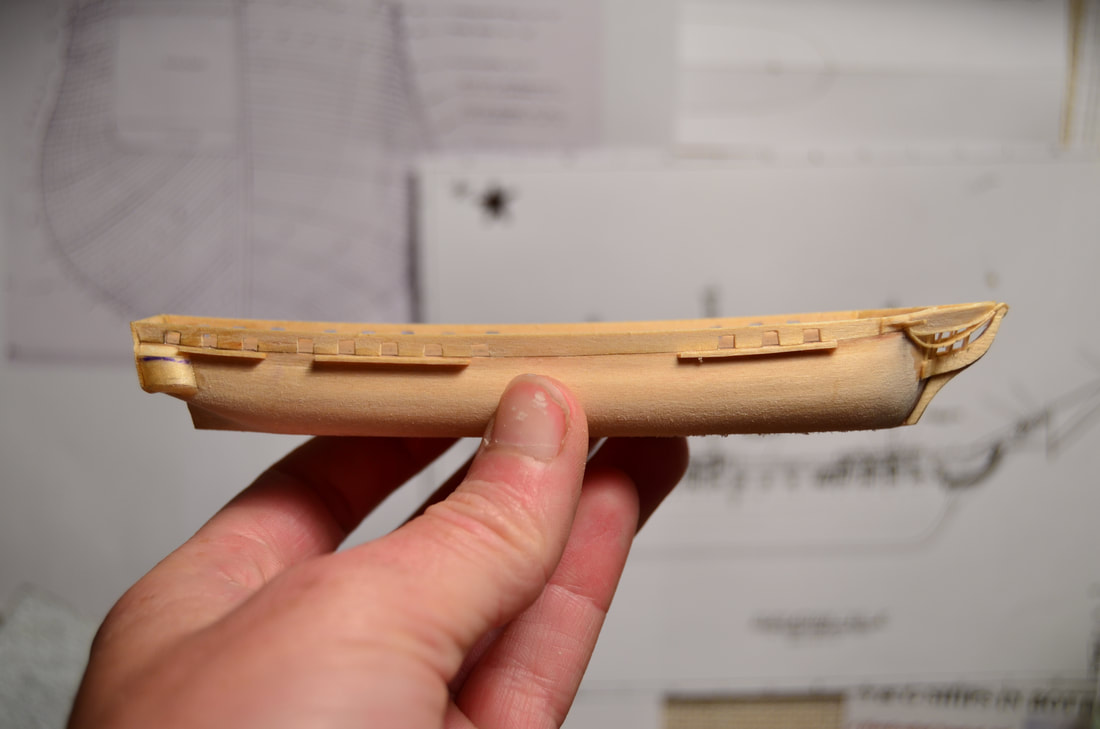
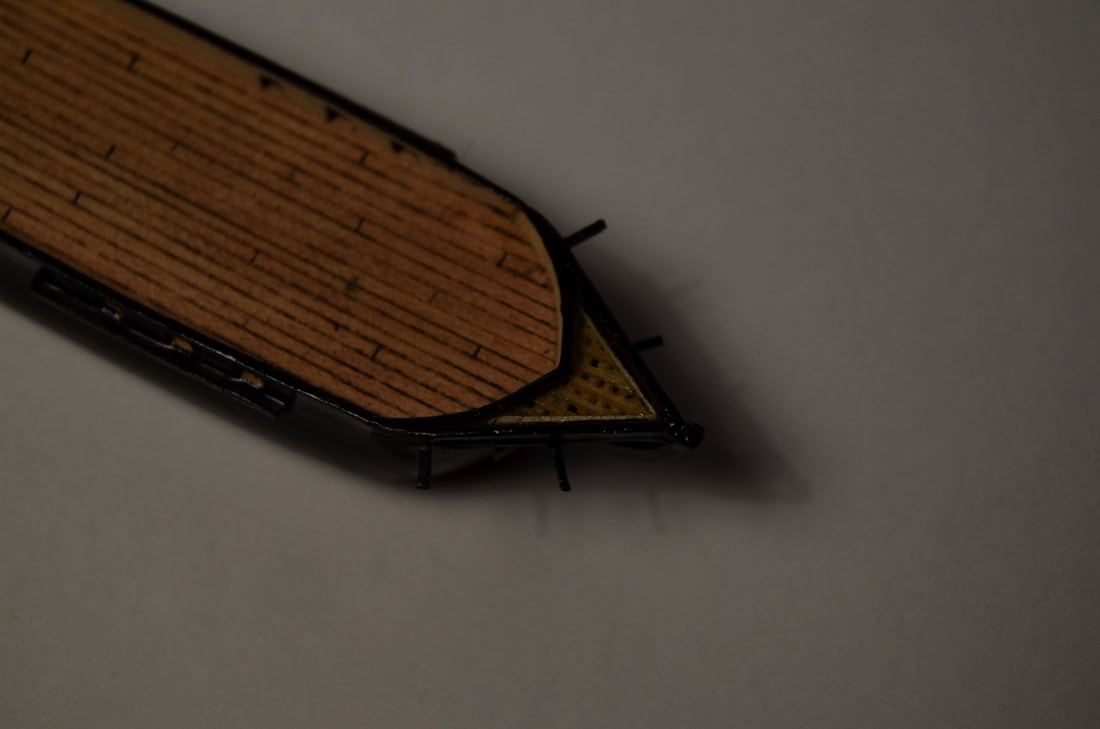
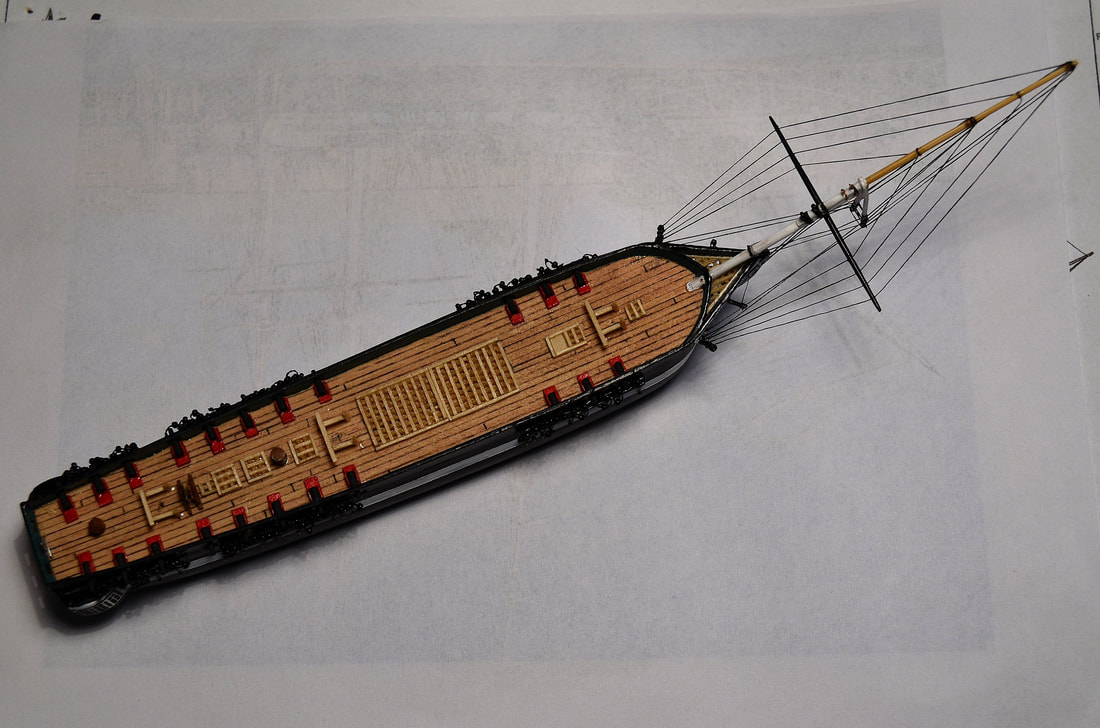
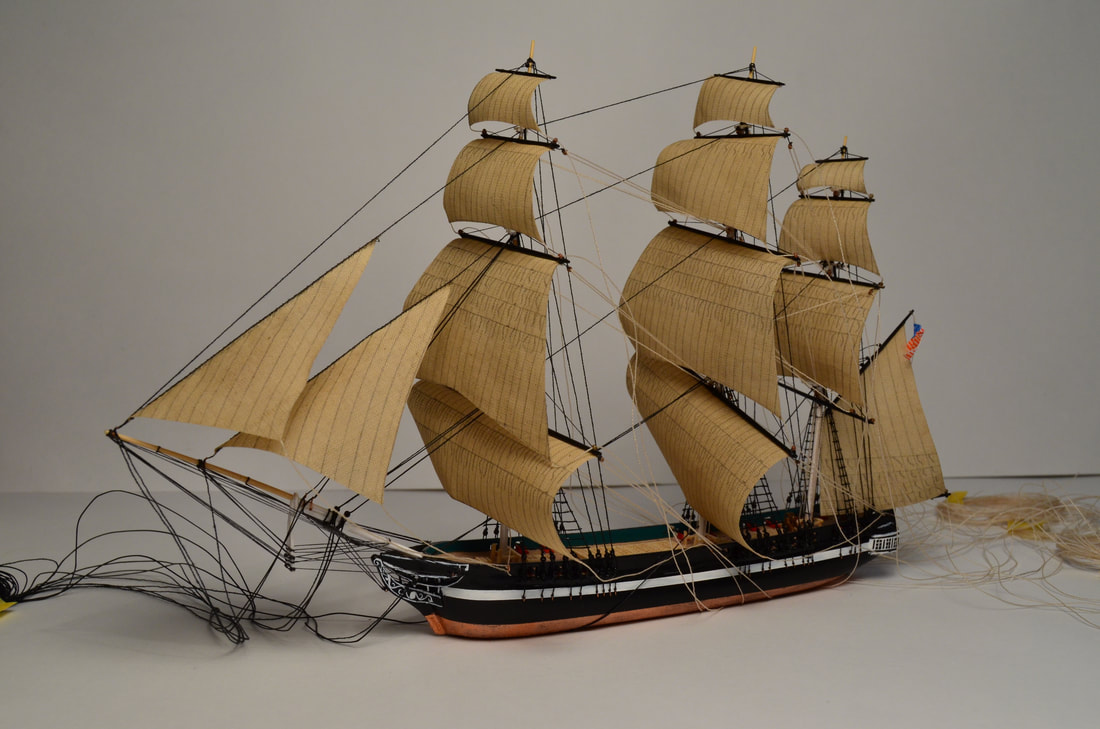
Before beginning my project, I obtained some plans of the vessel, so that I would be able to carve the hull as accurately as possible at the small scale. The shape of the hull above the waterline is narrow and long, and she has a rather interesting cross-section form. There is a strong tumble-home, and once it reaches near to the deck, gently slopes inward to the top of the bulwark. She also has a stern Gallery, without a balcony, that is quite appealing. My model was carved out of basswood using various chisels to achieve the overall shape. The bow piece with figurehead was added separately, as well as the bulwarks and stern galley. The gun ports have been cut out to receive the canons, and the deck planking have been marked with a fine tipped drafting pen to mimic the seam lines. |
|
|
|
|
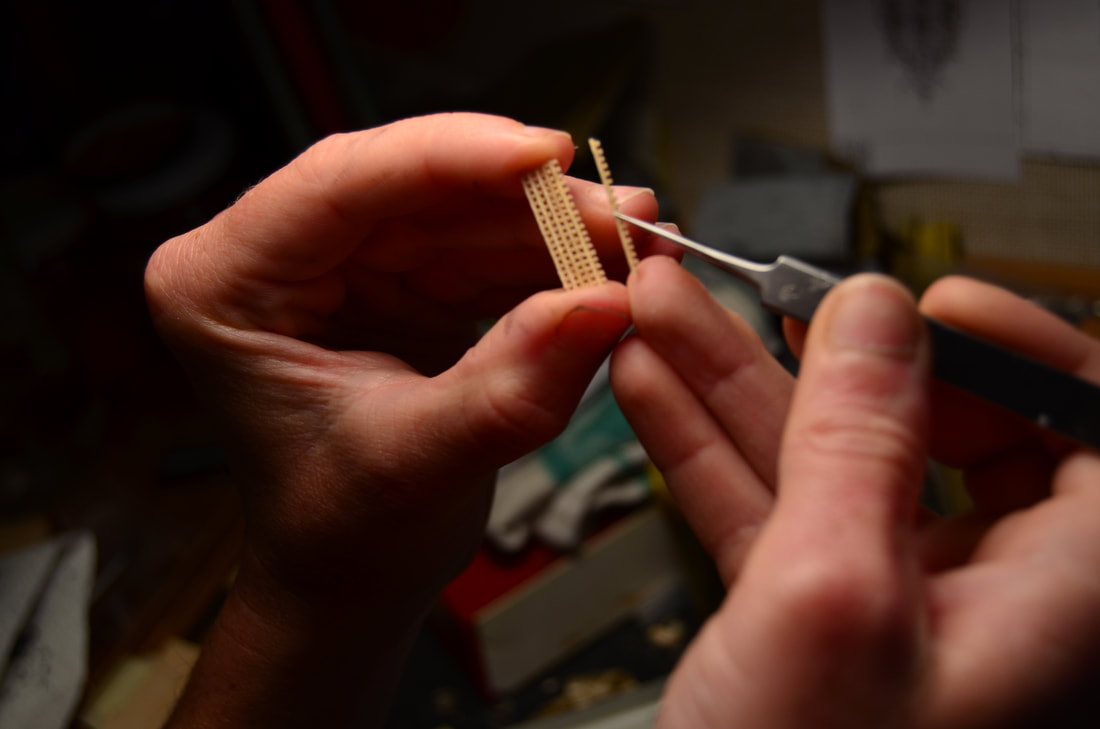
I was able to accomplish many of the details on the bowsprit that exist on the real ship, all of which was crafted out of wood. I even fabricated miniature grating, in the same fashion as a scale model builder, for the bowsprit platform. The gratings would also be used for the main hatch covers on the deck. The sides of the stern gallery were fairly complicated, and I was unsure how to create the rounded balcony on each side. I ended up using chisel shaving that were rounded over to the right radius and carefully cut them to shape before gluing them in place. Once I was happy with the hull shape, I painted her with black enamel paints and began fabricating the deck details (hatches, canons, capstan, etc...).
|
|
|
|
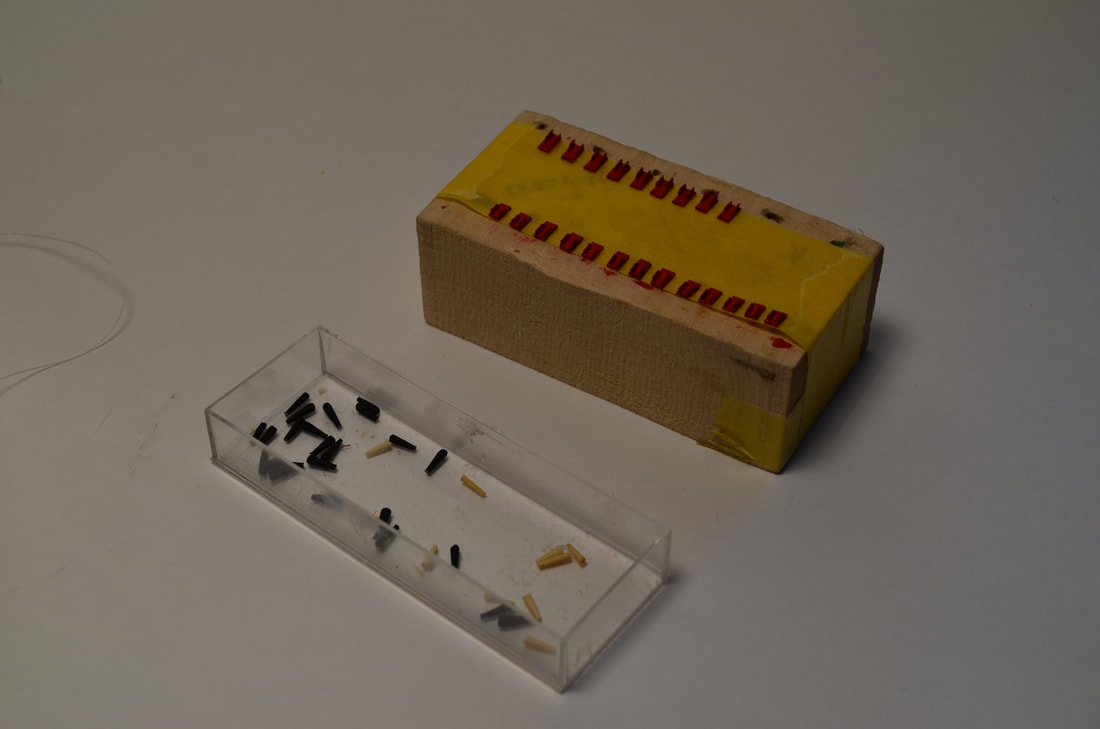
Canons were fabricated by cutting a rectangular base with two vertical supports out of basswood. For the canon barrels, I cut the tips off of toothpicks and sanded the butt of the barrel round.
All the pieces were painted to suit before attaching the cannon barrel to the base. Each piece was then carefully glued in place on the deck, with the tip of the canon fitting through the gun ports. |
|
|
The large stowage hatches were made of grates which I cut to shape and then added a wooden frame all the way around. I completed the fife rails used for tying off lines at the base of each mast, as well as the double wheel and capstan.
|
The Bowsprit and Stern Gallery:
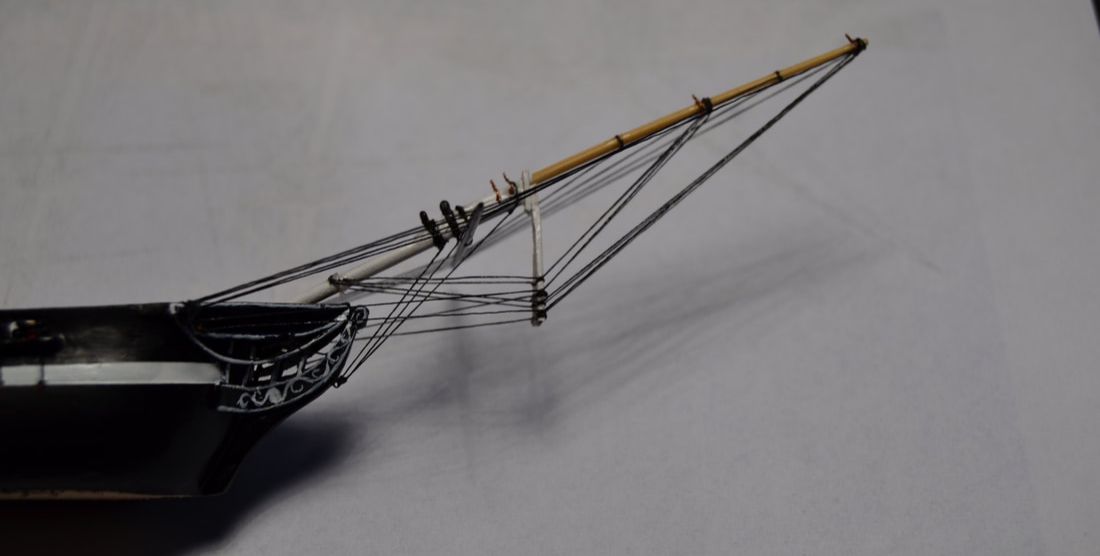
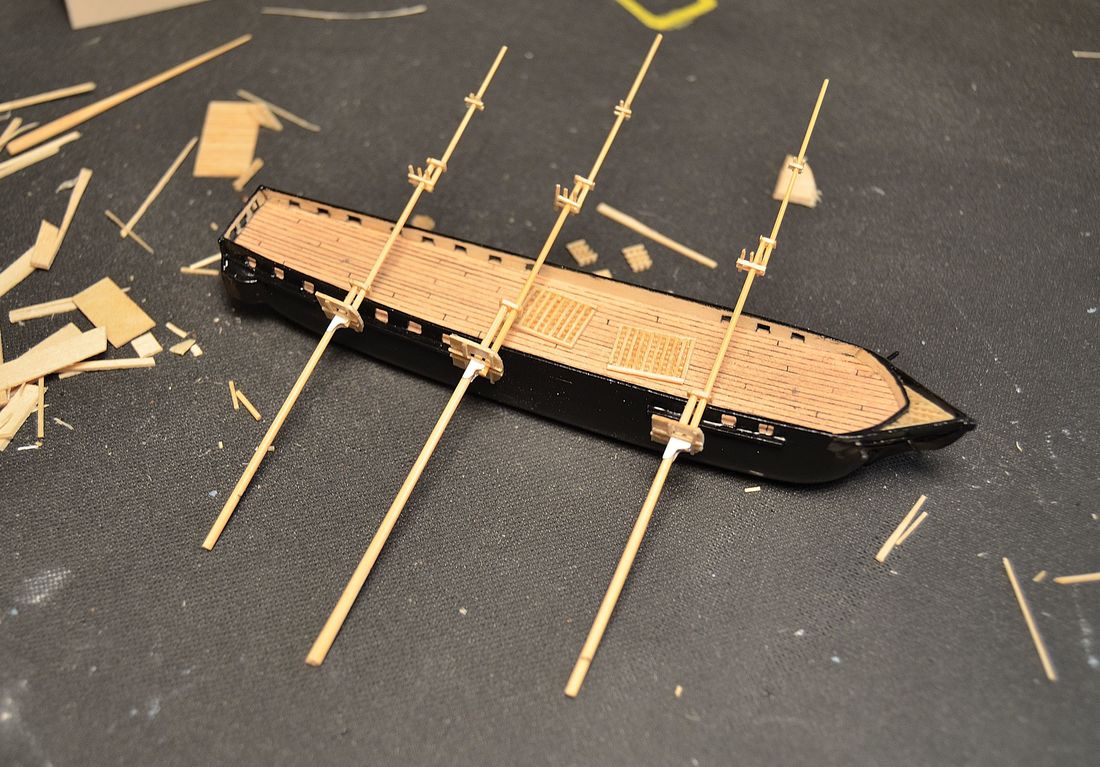
The bowsprit on the Constitution is quite intricate on this particular model, and may be the most detailed work I have done to date. Firstly, the bowsprit is fitted into a hole that I carefully drilled in the hull at the correct angle. This is done by eye and there is always some adjustments to be made. The bowsprit is fabricated out of bamboo. This is a great wood to use since it is flexible but not brittle and prone to breaking. The bowsprit itself is made of two sections and a double armed dolphin striker descends from the bowsprit where the two sections are attached. Most importantly, I had to create a slight bend in the bowsprit, which I achieved by pulling the lines very tightly and tying them off to a fitting on the bow.
The bowsprit also has a long yard that acts as a spreader. I drilled holes through the yard, spacing the lines that run from the bowsprit back to the hull of the boat. These lines couldn't be glued in place because the yard has to articulate, so that it can pass through the neck of the bottle. Instead of drilling holes through the bowsprit to pass my stays through, I made small eyelets with copper wire (stiff enough to hold its shape), then wrapped the tails around the spar, gluing them securely in place. |

|

|
|
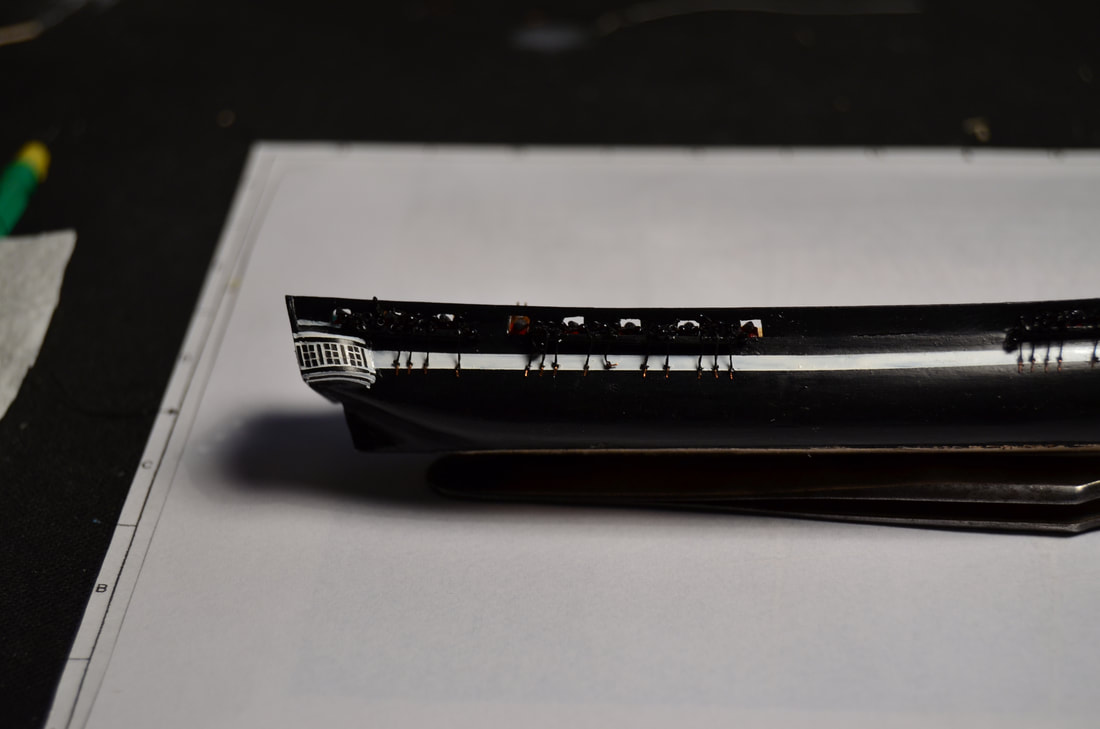
The transom was added onto the model as a separate piece after carving and extends beyond each side of the hull to receive the windowed balconies on each side. It was painted black. I hand painted a white trim all the way around, and the eight columns as well as the eagle were cut from archival paper and glued in place. The paper is much cleaner than paint and allowed me to attempt cutting the eagle multiple times before achieving the right shape and size.
|
The windows on each side of the stern section were fabricated out of wood, and I was surprised I was able to achieve it. When you carve a thin layer of wood with a flat chisel, the wood curls on itself. I still had shavings lying around from when I carved the hull and saw how perfect that would be to represent the rounded gallery windows. By carefully cutting them to suit and not breaking them, I was able to add the rounded windows. This was then painted white and black paper was glued to the surface to represent the window panes and other details.
Preparing the Masts:
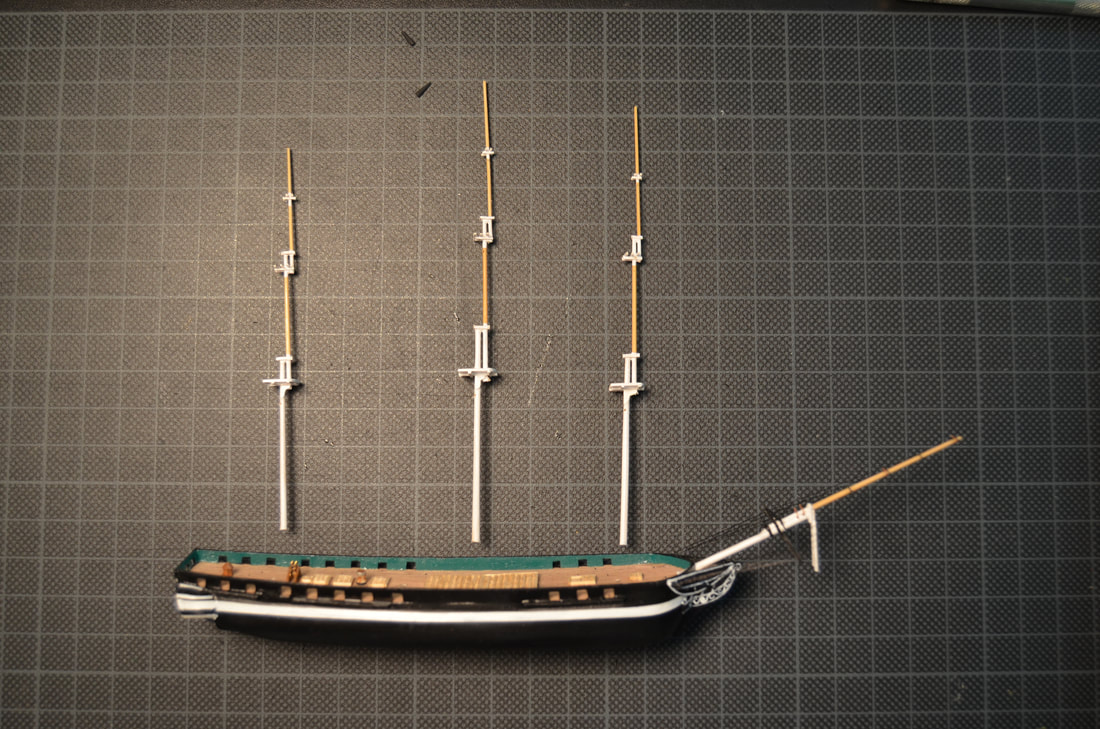
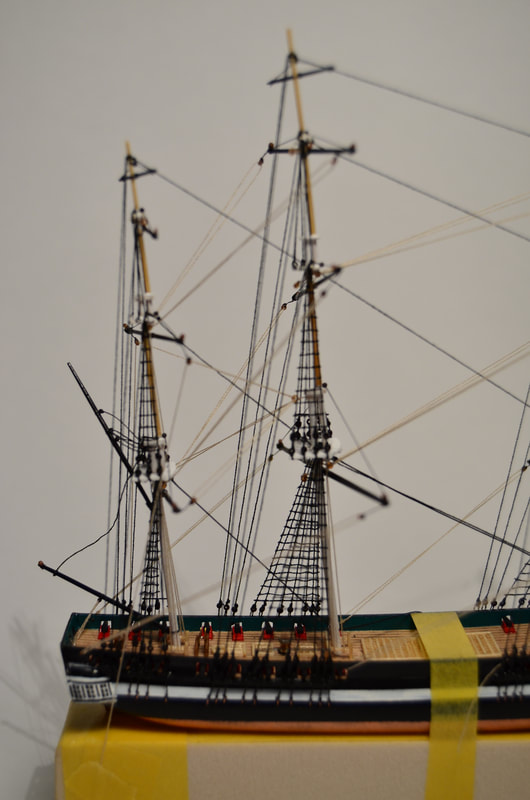
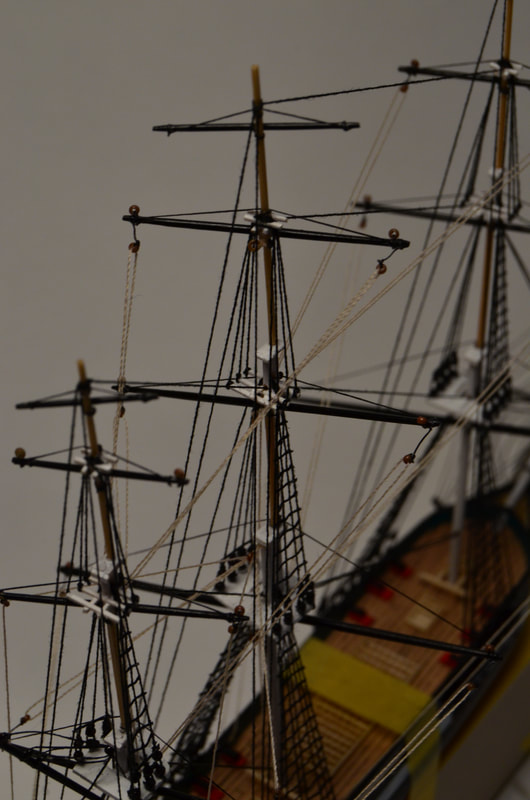
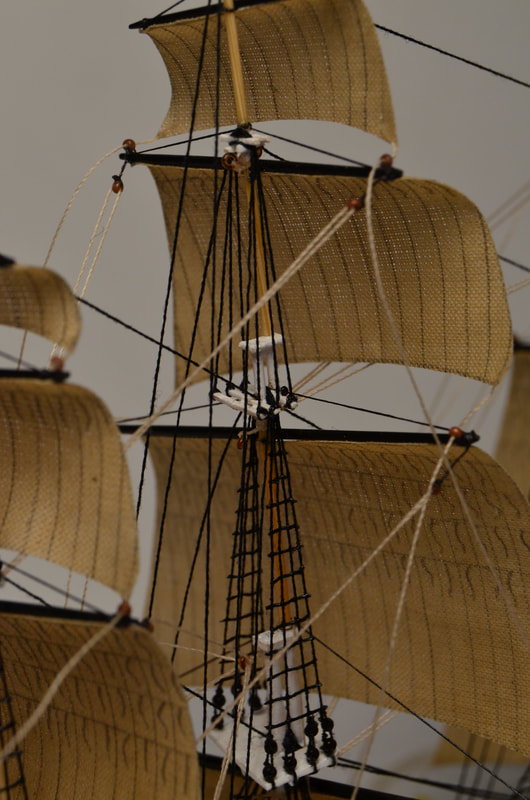
All the spars were turned from bamboo skewers. I left each mast section and yard a little longer, so that I could hold onto them with a pair of tweezers while painting or varnishing. They were all left to dry by placing them in holes that I drilled in blocks of wood. This keeps them organized, and each block represents a mast set.
All the spars were turned from bamboo skewers. I left each mast section and yard a little longer, so that I could hold onto them with a pair of tweezers while painting or varnishing. They were all left to dry by placing them in holes that I drilled in blocks of wood. This keeps them organized, and each block represents a mast set.
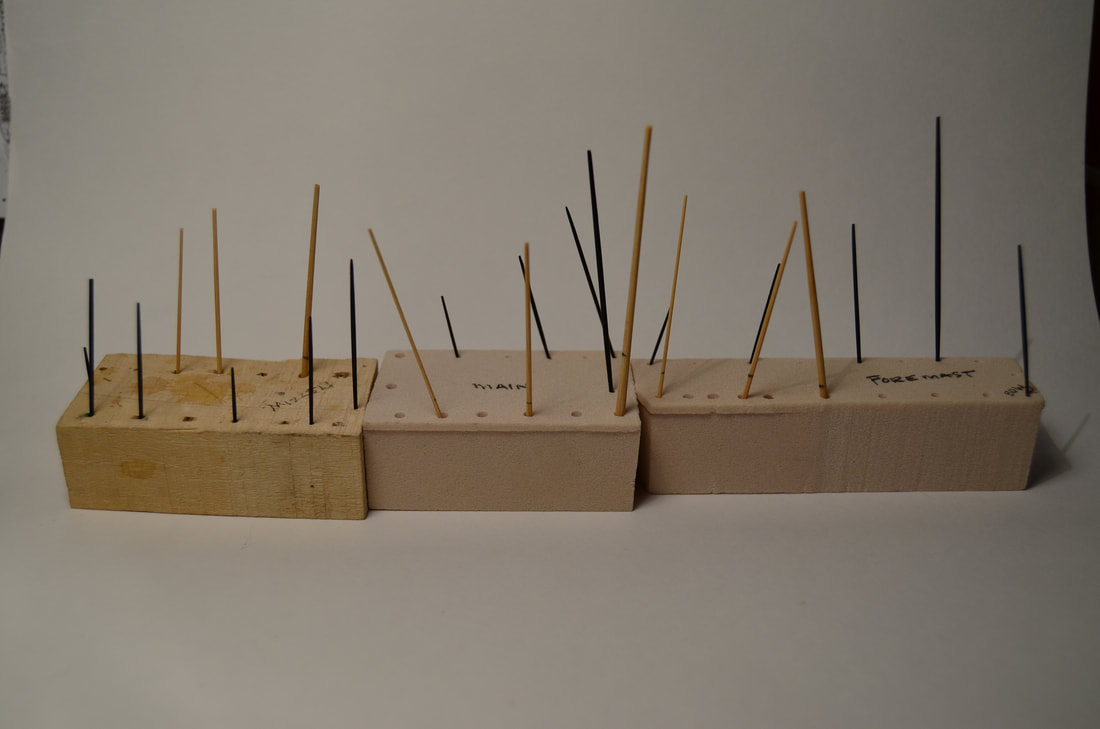
All the mast sections were carefully glued together with super glue. I used two spacing blocks between each section, leaving a gap that the shroud lines can pass through, just as they would be in reality. I also had the plans for the tops, or mast platforms and and crosstrees, so was able to reproduce an accurate miniature version, though sometimes I wonder if it's worth the trouble, since it may not be able to be seen through the glass of the bottle.
|
|

|
The yards were then lashed to the masts. I was careful to only glue the knot, since they all need to articulate to pass through the neck of the bottle. Lifts run through a mini seed beads, which represents the blocks. These are lashed to the mast, and tied to the end of each yard. Blocks were then attached to the yard tips, to later receive the braces and sail sheets. Before stepping the masts on the ship, all the stays were tied on where needed. It's much easier to attach all lines, fittings, blocks, etc...before you step the mast, as everything is much more accessible and easier to manipulate beforehand.
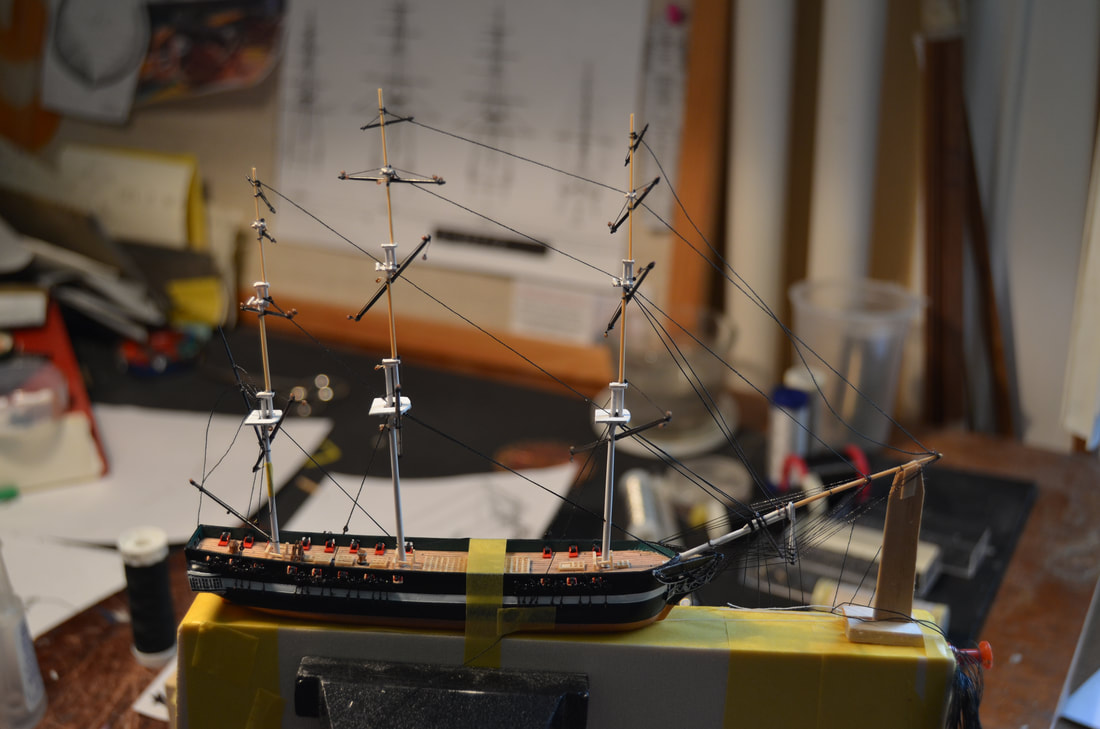
Stepping the Masts & Adding the Rigging Lines:
Once my mast were prepared, I began the trial of positioning them on my ship. At the base of every mast, there is a small hole drilled vertically to create a small tube. A long string is glued into this hole. That line, then passes through a hole drilled vertically through the hull, from the deck to the underside of the ship. In this way, I don't need a hinge system, which is often bulky and unattractive. Once the ship in inserted into the bottle, these lines are pulled tight, positioning the mast and helping to erect it. They are then glued and cut away once it's inserted in the bottle.
Once my mast were prepared, I began the trial of positioning them on my ship. At the base of every mast, there is a small hole drilled vertically to create a small tube. A long string is glued into this hole. That line, then passes through a hole drilled vertically through the hull, from the deck to the underside of the ship. In this way, I don't need a hinge system, which is often bulky and unattractive. Once the ship in inserted into the bottle, these lines are pulled tight, positioning the mast and helping to erect it. They are then glued and cut away once it's inserted in the bottle.
|
|
On this ship in particular the bowsprit was so long that I fabricated a small support, so when I pulled the stays (lines passing through holes in the bowsprit), I wouldn't accidentally break anything. The stays were then pulled to achieve the proper angle and position of the mast. As I pulled each mast forward and into position, I began attaching the rear shrouds. These were tied in place, keeping the masts in the exact position necessary.
|
|
Rigging the ship is probably one of the most time consuming steps in constructing a square rigger. All the shrouds were slowly added and tied to the double set of dead eyes, which had been previously attached.
The stays and the shrouds (standing rigging) were often coated black with tar. The running rigging (rigging that moves) is brown or tan (except in a few places where I chose to use a special black thread). This includes the braces, which run from the yard tips back to a point on the ship, where they can be controlled from the deck. Ratlines were added by weaving lengths of thread through the shrouds and gluing them securely. The excess line was then cut away. By weaving them, they won't pop off when I insert the ship into the bottle. Final rigging details include the mainsail sheet, which passes through a fitting on the deck, as well as a flag halyard. Some halyards were added and tied off at the base of the mast to mimic the way lines are tied off to belaying pins. |
|
|
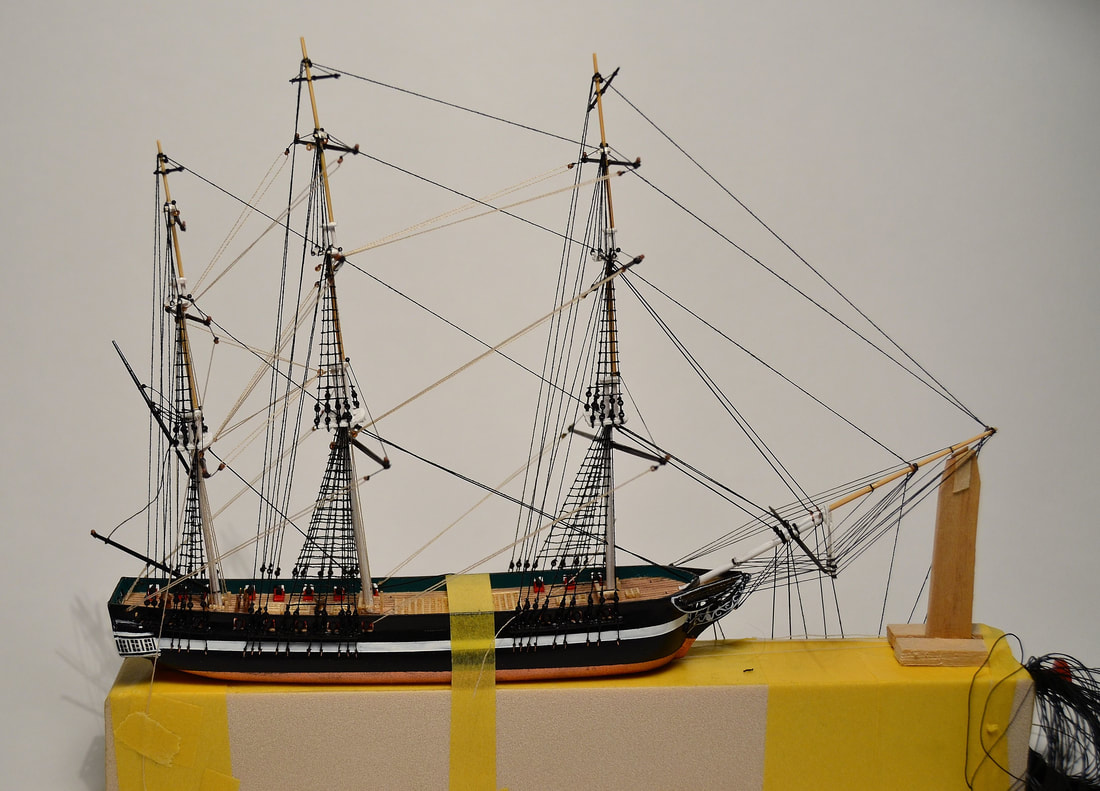
Attaching the Sails:
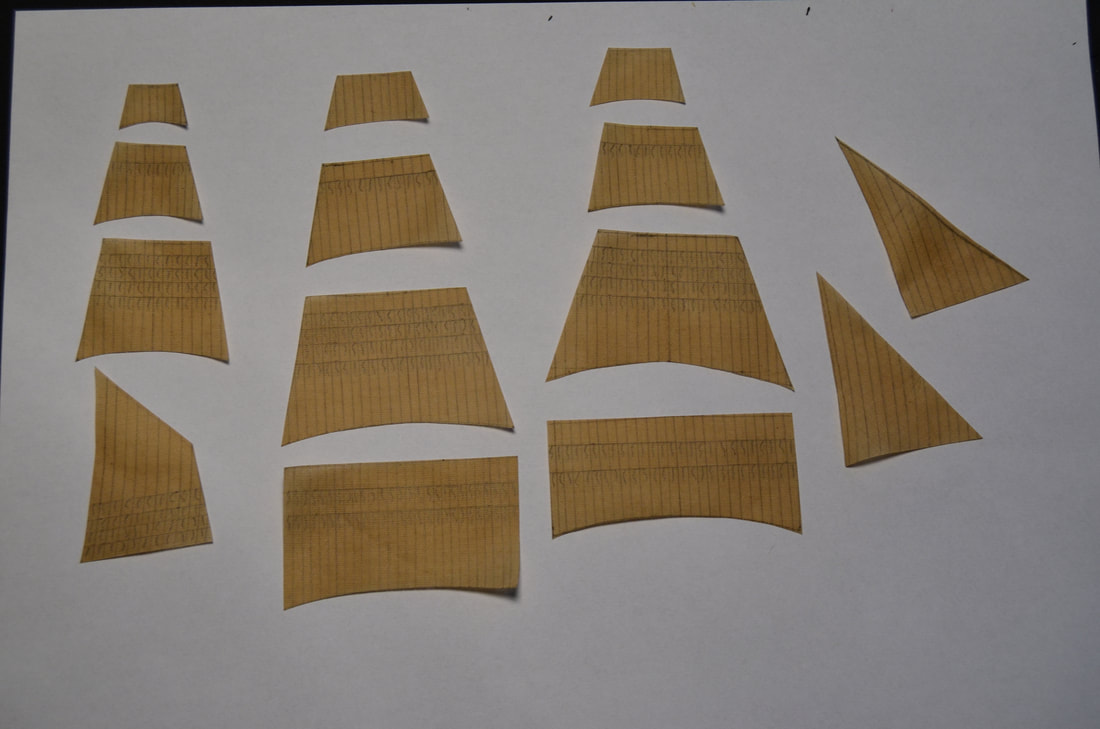
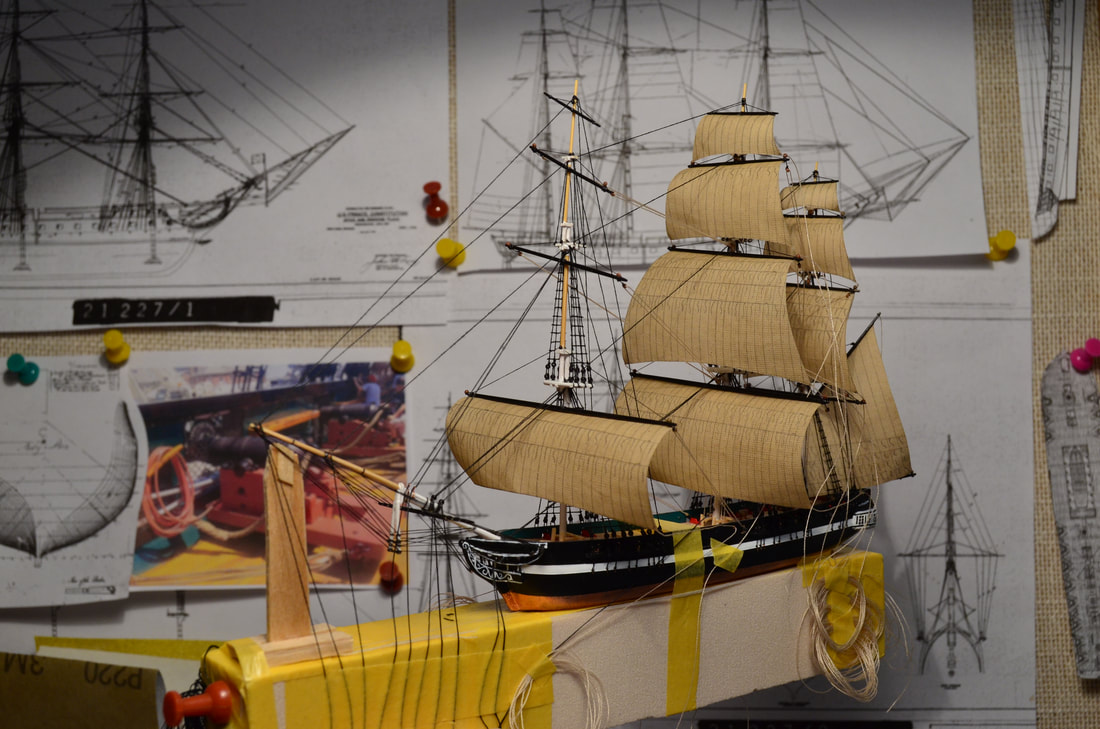
The number and type of sails I add to any ship is dependent on the "weather conditions" that I want her to be sailing in. I decided to omit one jib, but included all other sails, so that I could display the ship sailing with the wind on her starboard transom and under light conditions.
Sails were fabricated from a very fine linen. Each sail is marked on the fabric, stained by coffee, then glued stiff with thinned wood glue. Gluing also keeps the edges from fraying. The reefing points and seam lines were marked on both sides of every sail, making them ready to attach to the yards and stays.
|
|
|
|
Sheets were added to the bottom corners of the sails, and each sail was curled over a round dowel to give it shape. The upper edge was then bent over to create a nice surface to glue to the yard. Once the sails were on, the sheets were passed through blocks and left loose. These will be pulled tight once it is inside the bottle, glued, and cut away.
Attaching the two jibs to the stays was a little more complex. Each jib was sewn onto the stay. I accomplished this by using a needle tip to press holes along the sail edge. I then used a very fine, stiff thread, that required no needle to sew the jib on. With that accomplished, the ship was ready to bottle! |
|

|
Inserting the Ship into the Bottle:
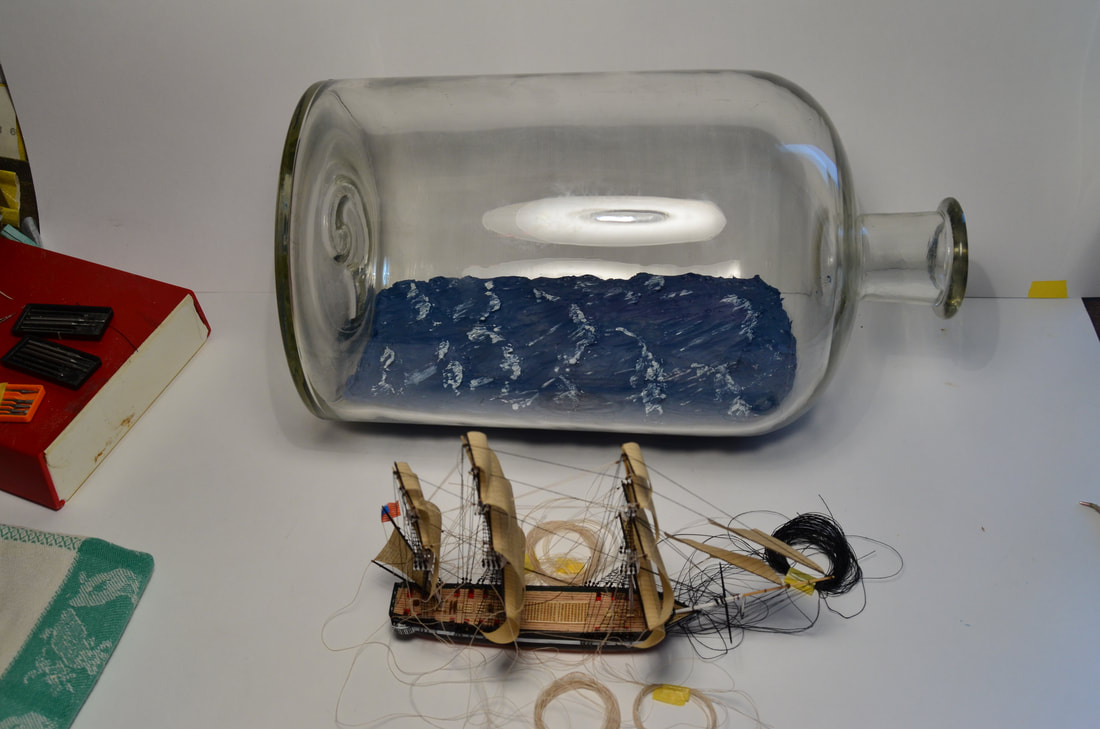
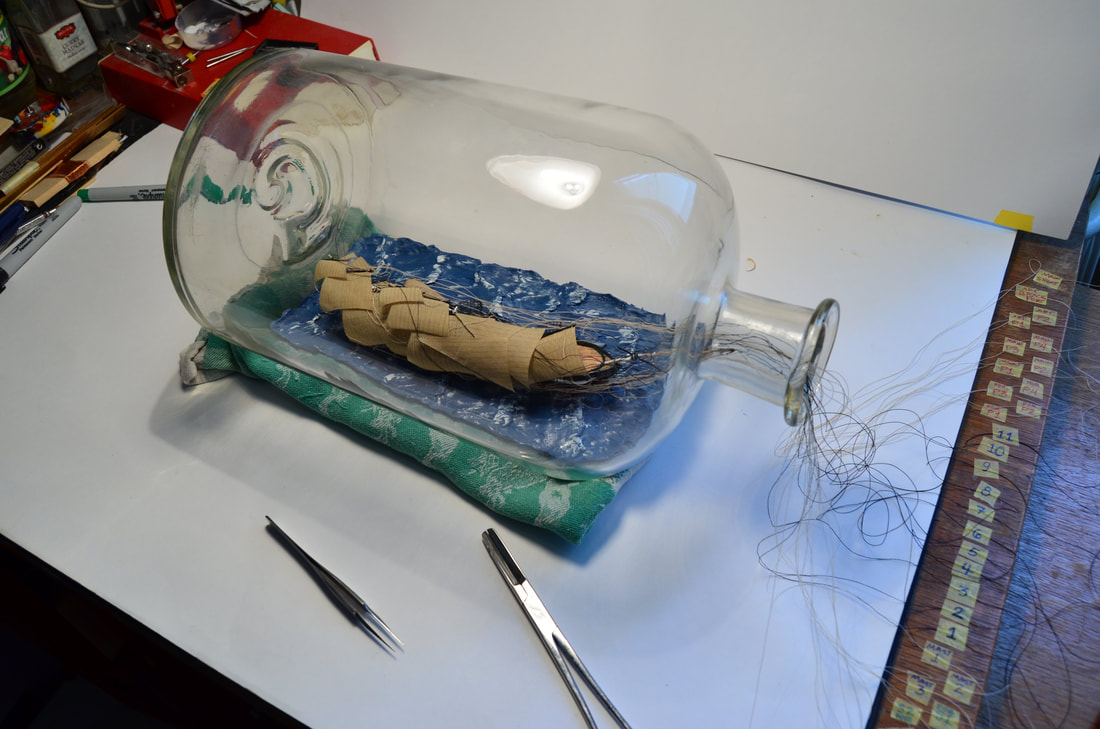
The big moment had finally arrived to insert the ship in the bottle! My bottle was prepared about a week prior, giving it a little time to stiffen slightly. The sea is a mixture of plumber's putty and artist's enamel paint. Overall, this putty never dries hard, and the surface stiffens and remains glossy, giving it a nice, water effect.
The putty was inserted bit by bit and molded with the use of long handled tools to create the waves. Later I went in and added white paint to represent the foam and small white caps one would see on the ocean.
|
|
|
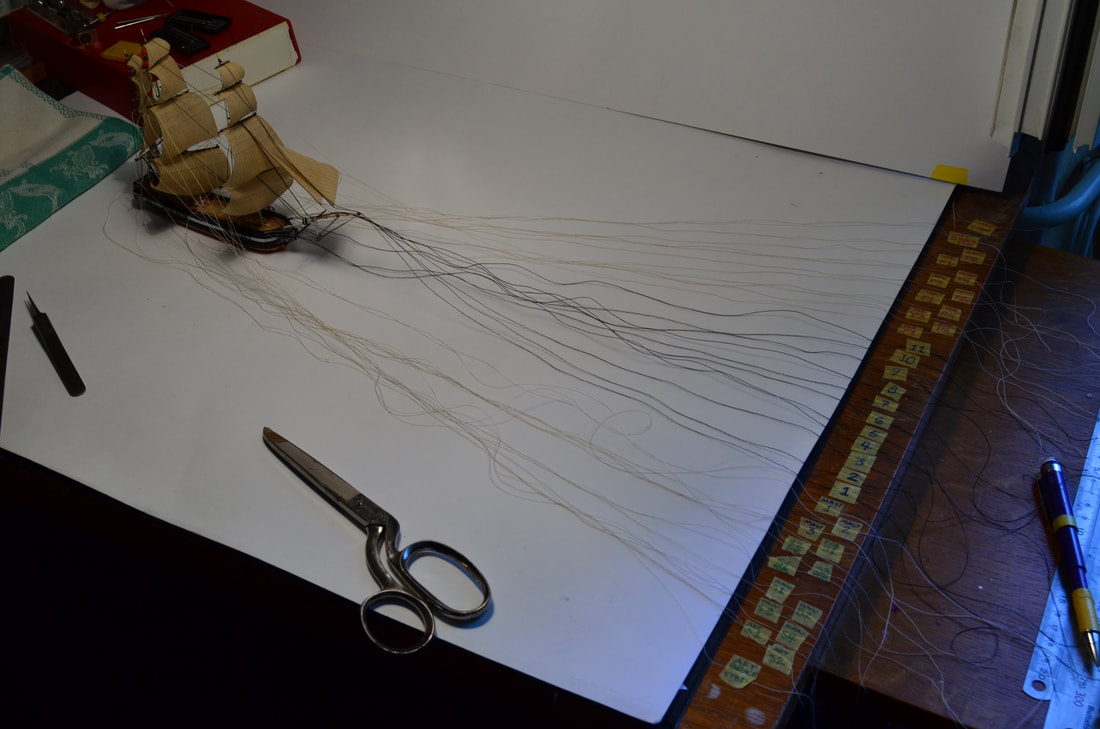
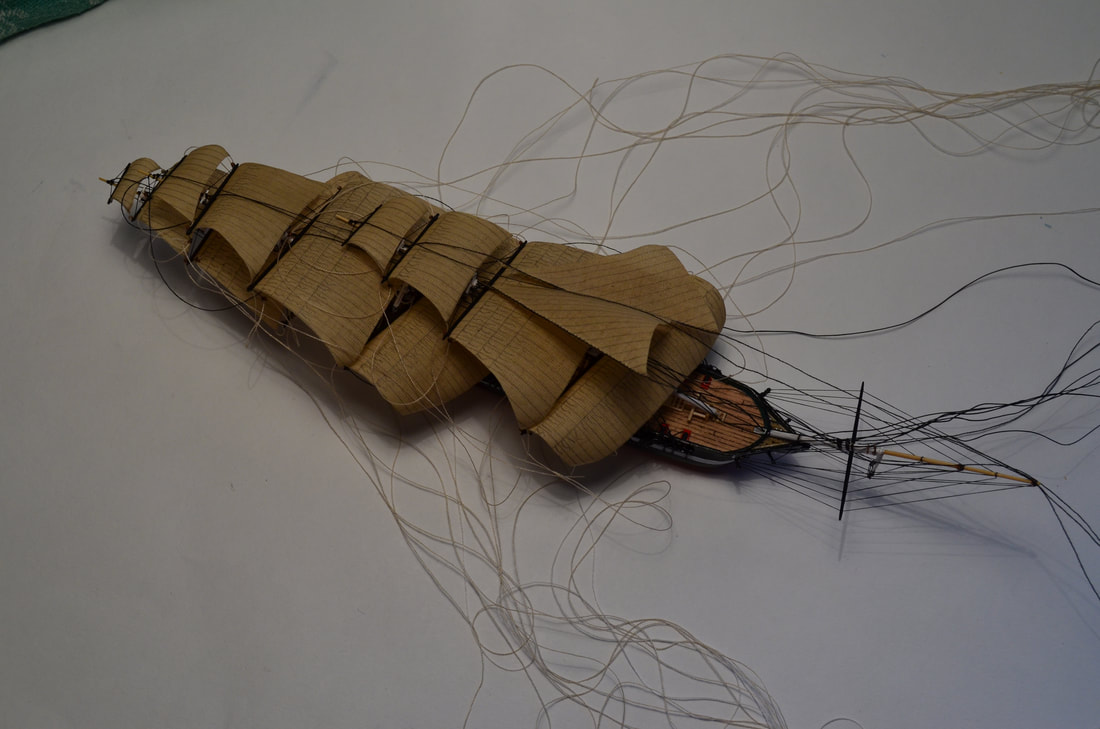
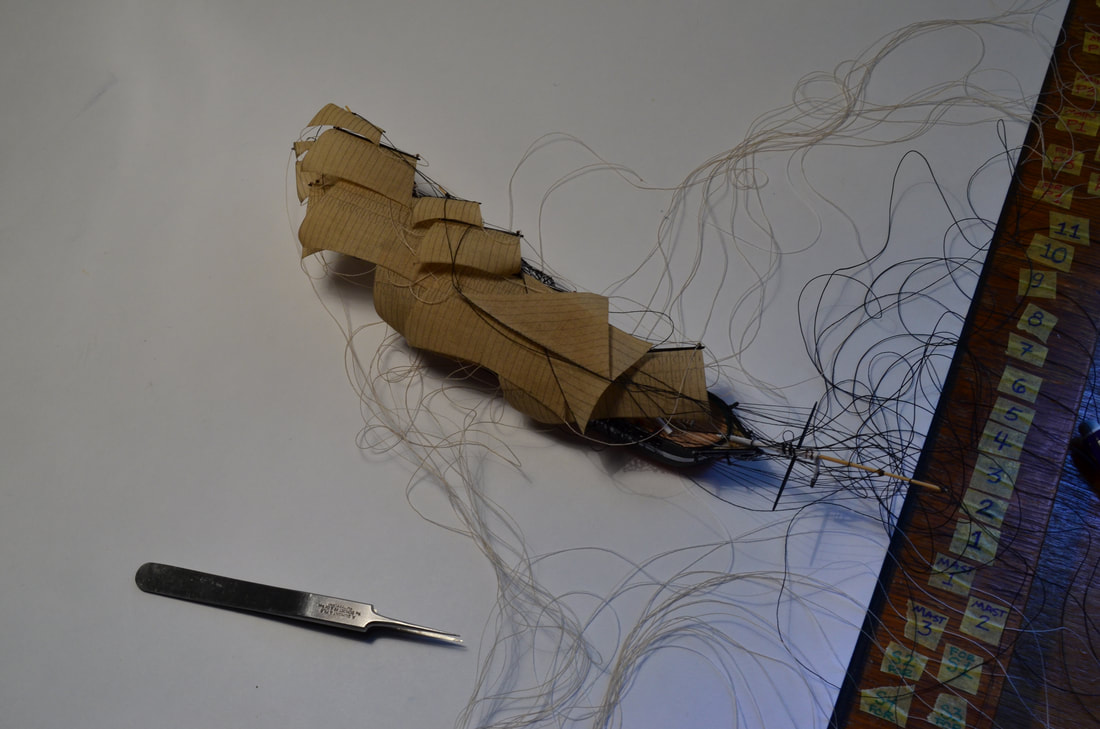
Once the bottle was ready and everything was nice and clean, I carefully unwrapped all the lines of my ship and untangled them. Each line was then organized, taped to the table, and labeled. In total there were 37 lines that would pass through the neck of the bottle, and taping them down allows me to have more control over them. It also helps to keep them from getting twisted around one another and developing knots.
|
The masts were laid down, and I made sure everything functioned properly, especially noting where lines might get caught on something. In this way, I would have an idea of what to expect.
The articulated yards were then turned so that they run the length of the hull, and the sails were curled around the bottom of the hull very carefully, trying to avoid creasing the fabric losing their billowed shape. |
|
|
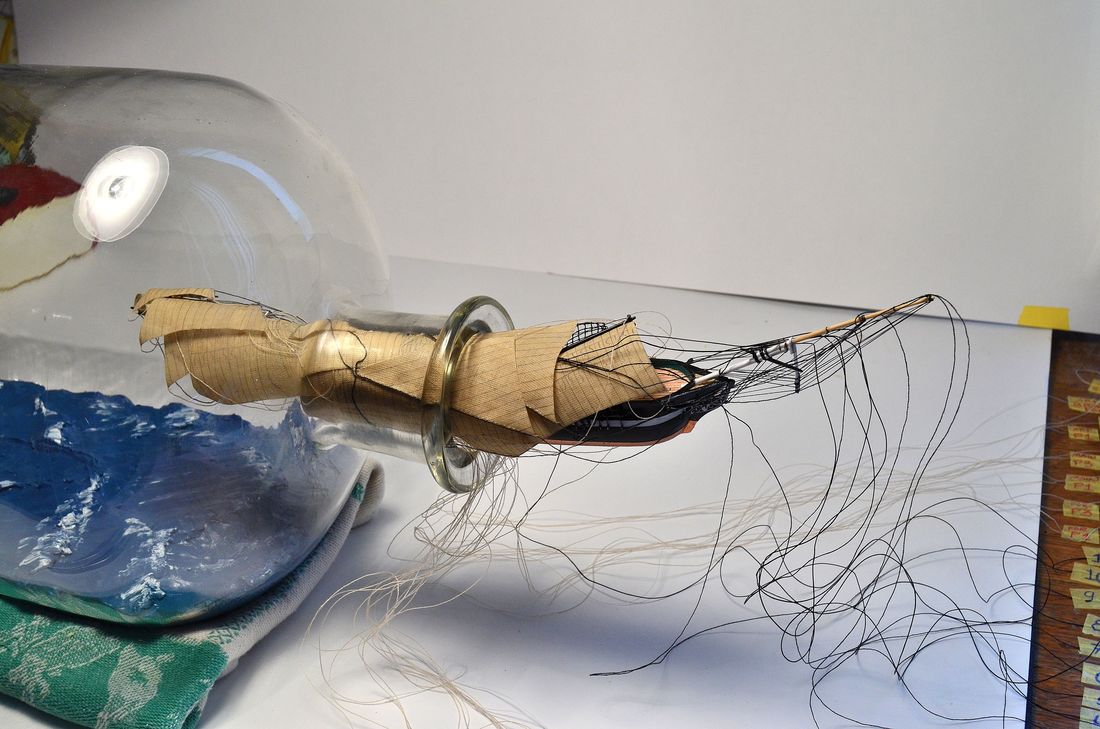
Finally, she was inserted into the bottle. With each millimeter it is inserted, I carefully check how everything is looking. I also need absolute silence and listen carefully for any sound that might suggest something breaking, since it is nearly impossible to remove the ship once it passes that point of no return (the bottle neck), for repairs.
|
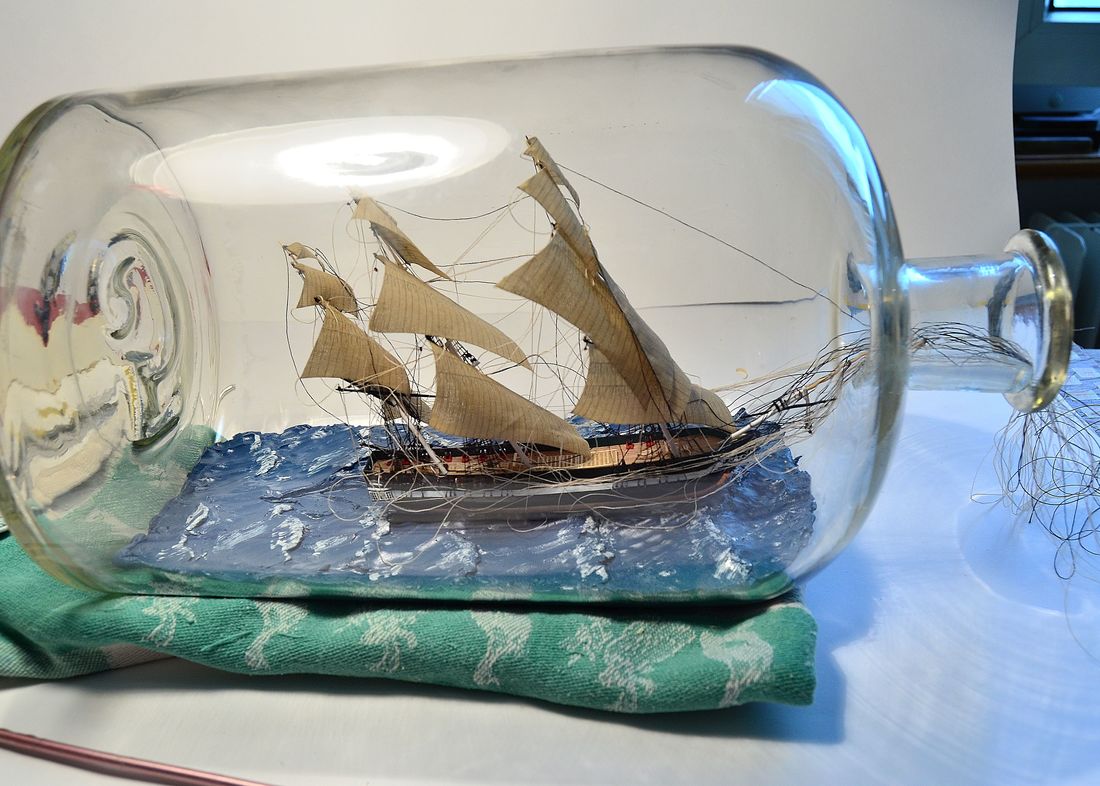
Once she's inside the bottle, the whole thing looks like an absolute mess, especially with all the strings passing through the neck of the bottle.
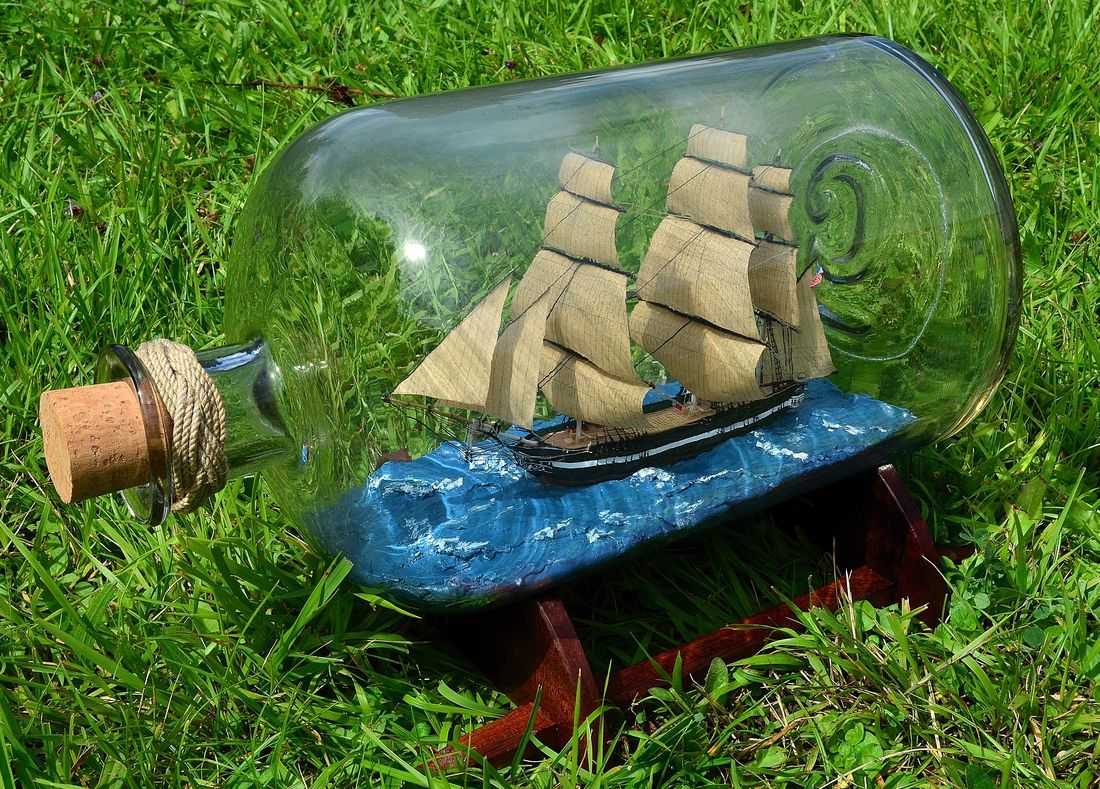
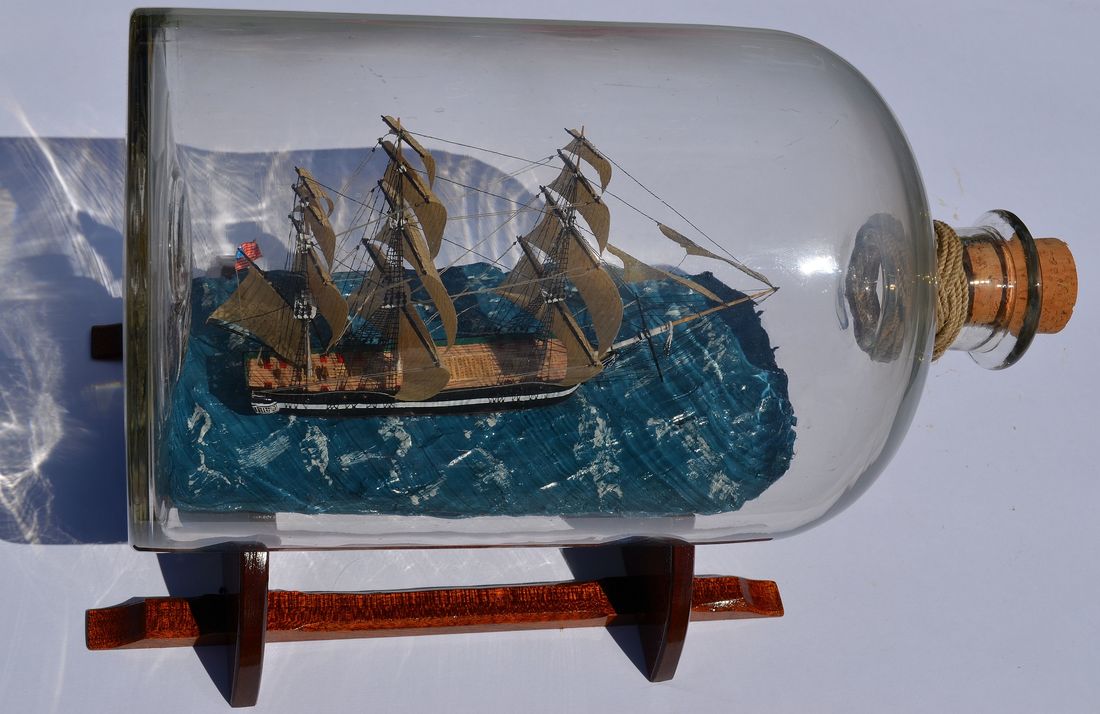
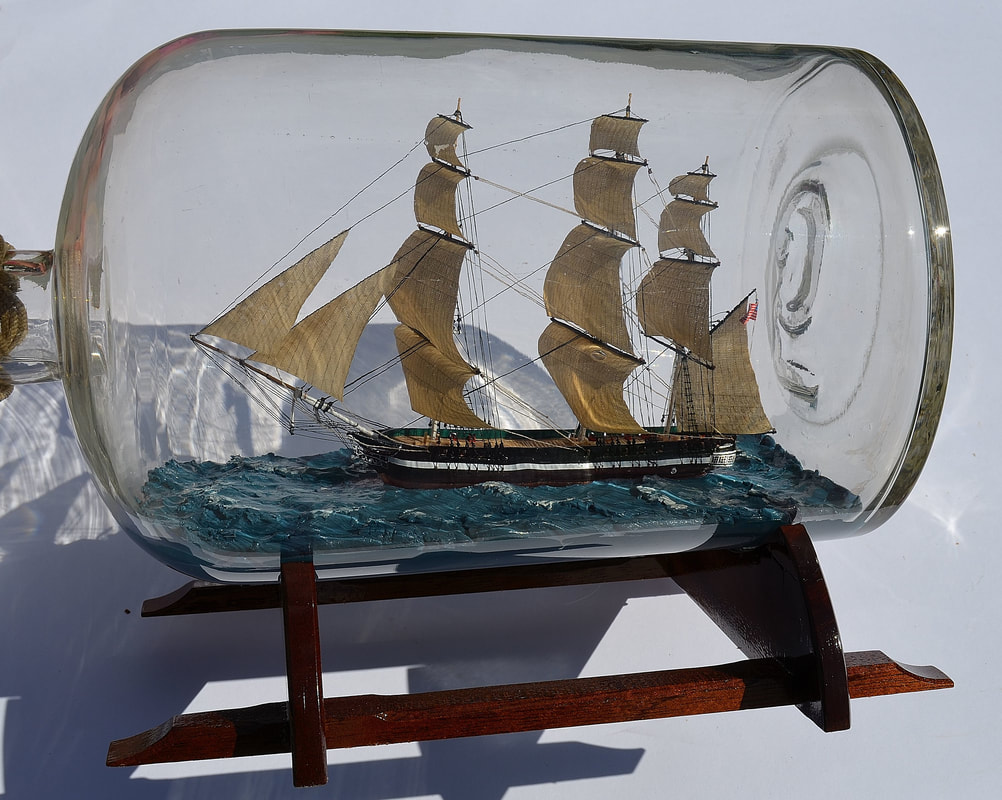
I began work inside by gently lifting the masts and loosening everything up a little bit. Tools were used to apply pressure on the hull or the base of the mast, while I tugged at the lines to step the masts in position. Because the mast bases where loose and not hinged, The boat passed through the neck of the bottle much easier, however raising them is much more difficult. After the masts were stepped, I glued the hull of the ship into the sea with epoxy. I then began the tedious task of sorting the lines, pulling them all into position, gluing them, and cutting all 37 of them away, leaving no trace of how the work was accomplished. On this ship, it was a task that took two days of work, with four to five hours of work each day and lots of staring and examining of everything, to make sure it was happy and exactly how I had planned it to be. The yards were turned into position and left at an appealing angle, the sails were manipulated, so they appeared as if they were filled with wind, and the american flag flying on its halyard, gives the indication of the direction of wind on the ship. The antique, pharmaceutical bottle, the turk's head knot, elegant stand, and red wax sealed opening, are all the perfect touches that have pulled together, yet again, another successful ship in bottle! |
|
USS Constitution in Bottle Complete!
Model built by artist: Gabrielle Rogers
Model built by artist: Gabrielle Rogers
|
|
Stand built by Stefan Auer.
If you have any questions about this ship model or are interested in having one of your own, feel free to contact me via the contact form on the contact us page, and thank you for your interest into the build log of the "USS Constitution."
If you have any questions about this ship model or are interested in having one of your own, feel free to contact me via the contact form on the contact us page, and thank you for your interest into the build log of the "USS Constitution."